How to Install Drip Irrigation in Raised Beds?

Time:2026-10-15 Author:Sienna
0%

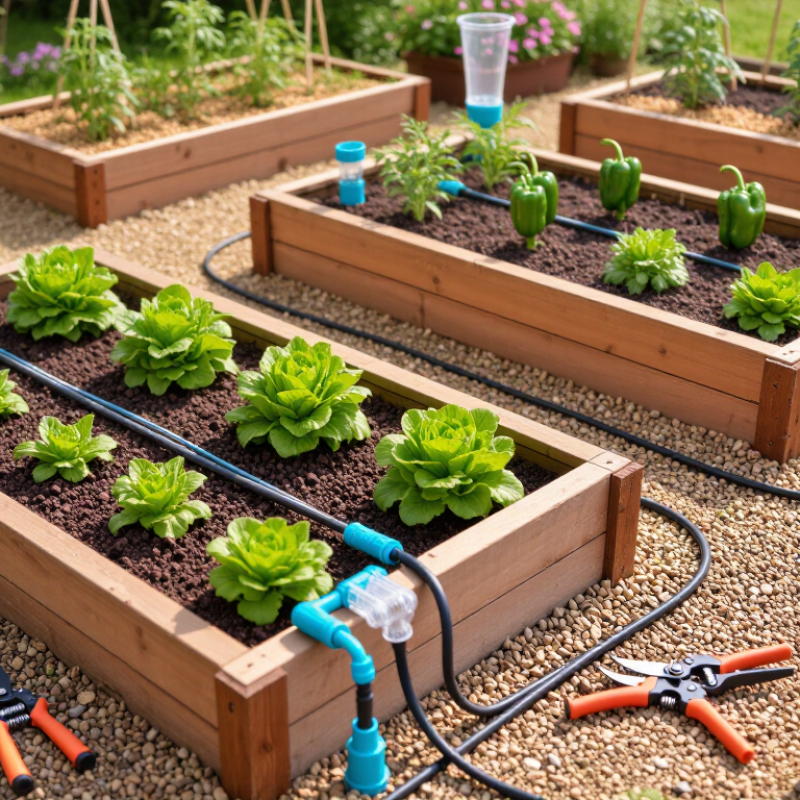
Learning how to install drip irrigation in raised beds can transform a thirsty garden into a measured, efficient growing space. Instead of spraying leaves, narrow tubes place water near the root zone. This reduces evaporation and keeps pathways drier. It also makes watering easier during hot afternoons.

Irrigation scientist Dr. Daniel Hillel observed, “The challenge is to produce more food with less water.” That principle fits raised beds closely. A reliable system needs more than tubing and emitters. It needs a clean water source, a filter, a pressure regulator, and suitable connectors. Measure each bed before cutting the line. Small mistakes become frustrating leaks later.

Start by mapping the beds, plants, and water entry point. Lay the mainline along the bed edge. Then position dripline beside crops, leaving enough space for root spread. Test the system before covering it with mulch. Watch for weak emitters, pooled water, or dry corners. These details reveal uneven pressure.

Not every setup will be perfect.

Older beds may shift. Tubing may curl in cool weather. Some plants may need more water than their neighbors. Review the layout after several watering cycles, and adjust spacing when the soil stays muddy or dusty. This guide will explain how to select components, connect the system, check flow, and maintain it through changing seasons. The goal is not maximum equipment. It is steady moisture, healthier roots, and fewer wasted gallons.
How to Install Drip Irrigation in Raised Beds?

Map Bed Dimensions and Size Tubing for 0.5–1 GPH Emitters

How to Install Drip Irration in Raised Beds?

Measure every raised bed before buying tubing. Record length, width, and the distance between beds. A 4-by-8-foot bed might need four 8-foot drip lines. Keep rows 12 inches apart for evenly spaced vegetables. Mark the layout with a pencil and garden string. My first layout looked tidy, but one corner stayed dry. I had measured the bed, not the planting pattern.

Size the tubing from total emitter flow. For example, four lines with eight emitters each create 32 outlets. At 0.5 GPH, the zone uses 16 gallons per hour. At 1 GPH, it uses 32 gallons per hour. Use the lower rate for sandy soil or slow-growing crops. Clay soil may need wider spacing and shorter watering cycles. Check pressure loss across the full run, not just at the faucet. Tubing capacity varies with diameter, length, slope, and inlet pressure.

Good design improves consistency. The USDA Natural Resources Conservation Service identifies drip irrigation as a high-efficiency method when systems are properly designed and maintained. FAO guidance reports application efficiency near 90–95% under careful management. Those figures are not automatic. Flush lines before installation, install a filter, and inspect the final emitters after watering. A simple catch-can test can reveal uneven flow. Mine once showed a surprising difference between the first and last line. Recheck it after moving soil or adding mulch.

Install a 120-Mesh Filter and 20–30 PSI Pressure Regulator

How to Install Drip Irrigation in Raised Beds?

A raised-bed drip system needs clean water and steady pressure. Install a 120-mesh filter before the pressure regulator. This filter helps catch sand, rust, and fine organic particles that can block emitters. Place the filter where you can open it easily. Maintenance access matters more than neat appearance.

Set the pressure regulator between 20 and 30 PSI. This range usually supports consistent emitter flow without stressing narrow tubing. The USDA Natural Resources Conservation Service emphasizes filtration and pressure control as key parts of efficient micro-irrigation design. The U.S. Environmental Protection Agency reports that drip irrigation can use 20–50% less water than typical sprinklers. That saving depends on correct installation, not the tubing alone.

Install a pressure gauge after the regulator. Open the end of each lateral line briefly during flushing. Murky water should run clear before you connect or close the line ends. I prefer testing one bed first, because uneven elevation can change flow. It is easy to assume every emitter receives equal pressure. That assumption can be wrong.

Check the soil after watering: the top should feel damp, while the root zone should not become saturated. FAO AQUASTAT reports that agriculture accounts for about 70% of global freshwater withdrawals, making small distribution losses worth correcting. Inspect the filter weekly during the first month, especially after heavy rain or well maintenance.

Lay Drip Lines 6–12 Inches Apart Across Each Raised Bed

How to Install Drip Irrigation in Raised Beds?

Lay drip lines 6–12 inches apart across each raised bed. This spacing wets the root zone evenly without flooding the paths. For leafy greens, 6 inches often works well because plants grow closely together. Tomatoes, peppers, and larger vegetables may need 9–12 inches between lines. Keep each line parallel to the bed’s longest side. Secure tubing every few feet, especially near corners.

The U.S. Environmental Protection Agency reports that drip irrigation can reach about 90 percent efficiency. That performance depends on correct pressure, clean filters, and suitable spacing. USDA Natural Resources Conservation Service guidance also emphasizes matching application rates to soil intake. Sandy soil may need closer irrigation cycles. Heavy clay needs slower watering. Watch the soil, not only the timer.

I test one bed before covering the lines. After ten minutes, I dig small inspection holes between emitters. Moisture should form a connected band, not isolated wet spots. My own installations rarely behave perfectly. Uneven pressure can leave the far end dry. That assumption is worth questioning. Flush the lines, check clogged emitters, and adjust spacing where roots remain dry. A simple pressure gauge can reveal problems that surface watering hides. Mulch helps conserve moisture, but it can also conceal leaks. Check beneath it weekly during the first month.

Connect Emitters, Flush Lines, and Check Uniform Water Flow

How to Install Drip Irrigation in Raised Beds?

Connect the mainline to a filter, pressure regulator, and timer before laying tubing. Use one supply line along the bed’s edge. Place emitters beside plant roots, not against stems. For leafy vegetables, 30-centimeter spacing usually gives steadier moisture across the bed. Larger plants may need two emitters. Do not assume one outlet fits every crop.

The USDA Natural Resources Conservation Service describes drip irrigation as highly efficient when filtration, pressure control, and maintenance are correct. FAO Irrigation and Drainage Paper 56 also identifies localized irrigation as capable of about 90% application efficiency under good management. These figures are not automatic. A clogged filter can create a dry corner within days. I learned this after trusting pressure alone.

Flush the lines before closing their ends. Open each terminal cap and run clean water until debris disappears. Then close the caps and inspect every emitter. Water should form a slow, consistent drip, not a spray or weak trickle. Measure flow into identical cups for five minutes. Compare cups from the first, middle, and final emitters. The Irrigation Association recommends checking distribution uniformity, because uneven output wastes water and stresses plants. Recheck after several weeks. Soil settles, tubing bends, and roots can shift an emitter. Uniform flow is a moving target.

How to Install Drip Irrigation in Raised Beds? - Connect Emitters, Flush Lines, and Check Uniform Water Flow
Installation Stage Recommended Dimension or Setting Practical Action Verification Method Typical Result or Target
1. Measure the Raised Bed Bed length, width, and row layout Measure the planting area and mark each crop row before placing tubing. Keep the layout as straight as possible to simplify flushing and inspection. Compare the marked layout with the bed dimensions and count the planned drip lines. All root zones are covered without unnecessary tubing in walkways.
2. Choose Dripline Spacing 15–30 cm between lines Use closer spacing for densely planted or sandy beds. Wider spacing can suit larger plants or soils that spread water laterally. Measure the distance between parallel drip lines at several points. Spacing remains consistent from the inlet to the flush end.
3. Position the Main Supply Supply line along the bed edge Place the main line where each raised bed can be reached with a short branch connection. Secure it so movement does not stress fittings. Check that each branch can be connected without sharp bends or kinks. Branches remain accessible for seasonal maintenance.
4. Install Filtration Filter rating commonly 120 mesh for small drip emitters Install a suitable filter upstream of the drip lines. Select the filter according to the emitter passage size and water quality. Confirm the filter is installed before the distribution manifold and can be removed for cleaning. Debris is intercepted before it reaches the emitters.
5. Add Pressure Regulation Usually about 0.7–1.0 bar for low-pressure drip systems Use a pressure regulator when the source pressure is higher than the dripline operating range. Follow the tubing and emitter specifications. Read pressure with a gauge while the irrigation zone is operating. Pressure stays within the manufacturer's stated operating range for the components used.
6. Connect Branch Lines One branch per dripline or bed section Attach branch tubing to the main supply with a secure connector. Keep the connection fully seated and avoid twisting the tubing. Run water briefly and inspect every connection for leaks or separation. No visible leaks occur at the manifold or branch connections.
7. Lay Out the Drip Lines Emitters facing upward or as specified; lines parallel to rows Place each line near the plant root zone and secure it with stakes. Avoid tight bends, crushed sections, and exposed lines that may be damaged. Walk the entire bed and check that lines are flat, aligned, and unobstructed. Water is delivered close to plants without concentrated pooling.
8. Connect End Flush Points Flush valve or removable end cap on every line Install an accessible flushing point at the downstream end of each dripline. Keep the end above soil level when practical. Open each end briefly and confirm that water can discharge freely. Each line can be flushed independently.
9. Flush Before Normal Operation Flush main line first, then branches and drip lines Open the farthest outlets and allow water to run until visible particles and installation debris are removed. Close outlets gradually to avoid pressure surges. Collect discharge in a clear container and inspect for sediment. Discharge becomes clear and free of visible debris.
10. Check Emitter Flow Use a timed collection test, such as 1 minute Place identical containers under emitters at the beginning, middle, and end of representative lines. Collect water for the same period. Measure and record the volume from each container. Flow values are reasonably close across the line; investigate large differences.
11. Assess Uniformity Compare the lowest collected flow with the average flow Calculate a simple low-quarter distribution indicator: lowest-quarter average flow divided by overall average flow, multiplied by 100. Uniformity (%) = (Lowest-quarter average ÷ Overall average) × 100 Higher percentages indicate more even water delivery; uneven results may indicate clogging, pressure loss, or excessive line length.
12. Set the Irrigation Schedule Adjust by soil, weather, crop, and measured flow Start with short irrigation cycles and observe soil moisture at root depth. Increase duration gradually rather than relying only on surface appearance. Check moisture several centimeters below the surface before and after irrigation. Root-zone moisture is adequate without persistent runoff or waterlogging.
13. Inspect for Clogging Check filter, emitters, and flush points regularly Clean the filter when pressure loss increases or flow declines. Flush lines after maintenance and whenever sediment is suspected. Repeat the timed container test at selected emitters. Flow returns to the normal range observed during commissioning.
14. Perform Seasonal Maintenance Inspect before storage, frost, or long shutdowns Drain exposed components where freezing is possible, repair damaged tubing, and keep removable ends accessible for the next season. Review all connectors, valves, stakes, and tubing for cracks or blockages. The system is ready for the next operating cycle with minimal leakage.

Adjust Irrigation Timing Using Soil Moisture and Plant Demand

How to Install Drip Irrigation in Raised Beds?

Installing drip irrigation in raised beds becomes more effective when timing follows soil moisture and plant demand. Lay one line beside each row, keeping emitters near the root zone. Secure the tubing with ground staples, and test every connection before covering it with mulch. Water should soak downward, not spray across the leaves.

Check moisture two or three inches below the surface. A simple soil probe works well, though hand testing can be inconsistent. If the soil feels cool and slightly damp, delay irrigation. If it feels dusty or crumbles easily, add water slowly. Run the system for ten minutes, then inspect the soil again. Moisture should reach the active roots without creating puddles.

Plant demand changes with weather and growth. Newly transplanted lettuce needs short, frequent cycles while roots develop. Mature tomatoes may need deeper watering during hot, windy days. Reduce irrigation after cool rainfall, even when the timer suggests watering. My first schedule was too generous, and the lower soil stayed wet for days. I still check for yellow leaves, cracked soil, and runoff before changing the timer. Adjust duration gradually, such as adding five minutes, rather than doubling the schedule. Growth, mulch depth, and cloudy weather can shift watering needs within the same week.

How to Install Drip Irrigation in Raised Beds?

Adjust irrigation timing using soil moisture and plant demand. The guide below combines typical weekly water needs with practical irrigation frequency and allowable soil-water depletion targets for raised-bed crops.

Apply the weekly water amount in several short drip cycles. Irrigate when the root-zone soil reaches the recommended depletion level, then reduce or delay watering after rainfall or when a moisture sensor shows adequate water near the active roots.

FAQS

How should I measure a raised bed before installing drip tubing?

Record the bed’s length, width, and spacing from nearby beds. A 4-by-8-foot bed may need four 8-foot lines. Keep rows about 12 inches apart for even coverage. Measure twice. Mark the layout with garden string before cutting tubing.

How do I calculate the required water flow?

Multiply the number of emitters by each emitter’s flow rate. For example, 32 emitters at 0.5 GPH use 16 gallons per hour. The same layout at 1 GPH uses 32 gallons per hour. Check the complete run, not only the faucet connection.

What emitter spacing suits different soil types?

Use lower flow for sandy soil or slow-growing crops. Clay soil may need wider spacing and shorter watering cycles. Plant roots and soil texture matter. My measured bed once looked balanced, but one corner stayed dry.

What tubing size should I choose?

Choose tubing according to total flow, line length, slope, and inlet pressure. Longer runs lose more pressure. Narrow tubing can create uneven emitter flow. Test the farthest emitter before covering the lines with mulch.

Which filter and pressure regulator are recommended?

Install a 120-mesh filter before the pressure regulator. The filter helps catch sand, rust, and fine organic particles. Set the regulator between 20 and 30 PSI. Add a pressure gauge after the regulator. Keep access easy.

How should I flush and test the system?

Open each lateral line briefly before connecting or closing its end. Continue until the water runs clear. Test one bed before installing the entire system. A catch-can test can reveal uneven flow. That assumption fails.

How can I adjust watering time using soil moisture?

Check the soil two or three inches below the surface. Cool, slightly damp soil usually needs more time before watering. Dusty or crumbly soil may need slow additional water. Run the system for ten minutes, then inspect the root zone. Avoid puddles.

How does weather and plant growth affect irrigation timing?

Newly transplanted lettuce may need short, frequent cycles. Mature tomatoes may need deeper watering during hot, windy weather. Reduce irrigation after cool rainfall. Watch for yellow leaves, cracked soil, and runoff. Change the schedule gradually, such as adding five minutes. My first schedule was too generous.

Conclusion

Learning how to install drip irrigation in raised beds begins with measuring each bed carefully and choosing tubing that can support 0.5–1 GPH emitters. Install a 120-mesh filter and a pressure regulator set between 20 and 30 PSI to protect the system and maintain steady water delivery. Lay the drip lines evenly across the bed, spacing them approximately 6–12 inches apart so moisture reaches the root zones without creating overly wet areas.

After connecting the emitters and tubing, flush the lines to remove debris, then inspect each section for leaks and consistent water flow. Run the system briefly and check whether all emitters are working uniformly. Finally, adjust irrigation timing according to soil moisture, weather conditions, and plant demand. Sandy soil, hot temperatures, and larger plants may require more frequent watering, while cool or rainy conditions call for shorter or less frequent cycles. Regular observation helps maintain healthy plants and efficient water use.

Sienna

Sienna

Sienna is a skilled marketing professional with a deep expertise in our company’s core products and services. With a passion for innovation and detail, she plays a pivotal role in crafting insightful blog posts that not only highlight the unique features of our offerings but also provide valuable......