A tiny shed can hold more than expected when every wall, corner, and floor section has a purpose. This guide explores 2026 best tiny shed storage ideas for tools, garden supplies, seasonal equipment, and everyday outdoor essentials. The goal is not to fill every gap. It is to create a shed that remains usable.
Professional organizer Andrew Mellen offers a practical rule: “Don’t put it down, put it away.” That principle supports how to maximize storage in a tiny shed without creating clutter. Mount frequently used tools on a vertical pegboard. Add narrow shelves above shoulder height. Store screws, gloves, and plant labels in clear, labeled containers. Keep heavy items low, especially lawn equipment and packed storage bins.
Small details matter.
A 15-centimeter gap may fit a broom rack. A shallow shelf can protect seed packets from damp floors. Hooks behind the door can hold gloves, hoses, or folding bags. Measure each wall before buying organizers. Many attractive systems waste space because they ignore door swing, roof angles, or ventilation.
Some ideas may fail in your shed. A deep cabinet could block movement. Overhead storage may become unsafe without stable access. I have found that flexible storage usually works better than permanent compartments. Leave a small walking path, review unused items each season, and adjust the layout after real use. The best tiny shed is not perfectly packed. It is easy to enter, easy to clean, and ready when needed.
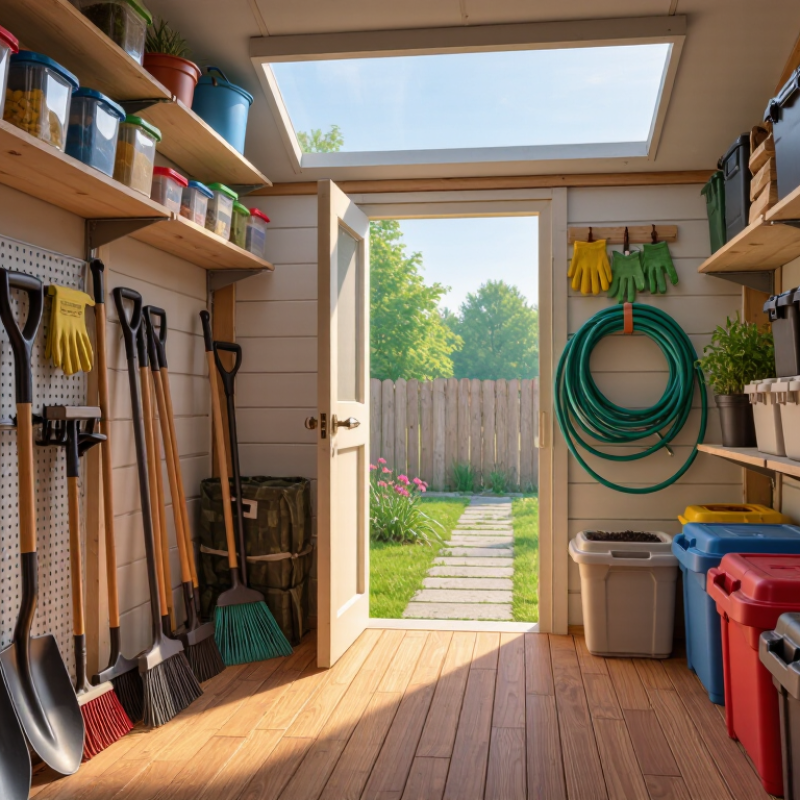
Measure the interior before buying storage equipment. Record floor length, wall height, door swing, and window positions. A 6-by-8-foot shed provides only 48 square feet of floor area. However, vertical walls can add valuable storage capacity without blocking movement.
Leave a clear path at least 30 inches wide near the entrance. This dimension supports easier carrying and safer turning.
The 2024 Self Storage Association Demand Study estimates that 12.6% of U.S. households rent self-storage. That figure signals a common problem: people own more seasonal equipment than their homes can hold.
Your shed may face the same pressure. List every item, then group tools, gardening supplies, outdoor cushions, and rarely used equipment. Measure the largest item in each group. Store frequently used tools between waist and shoulder height. Place lighter boxes overhead.
I once planned shelves around empty floor space and ignored the door’s opening arc. The layout looked efficient but failed in daily use. A simple sketch would have exposed that mistake.
Do not trust appearances. Check reach distance, lighting, ventilation, and moisture risks. The National Fire Protection Association advises keeping exits and access routes clear, so avoid stacking loose containers beside the doorway. Reassess the plan after one month. Some items will need a different home.
A tiny shed works best when every wall has a job. The 2024 Self Storage Association Demand Study reported that 16.7 million U.S. households used self-storage in 2023. That demand reflects a familiar problem: possessions grow faster than available floor space. In a shed, install shallow shelves above shoulder height for seasonal tools and sealed containers. Keep daily-use items between waist and eye level. This reduces bending, searching, and accidental clutter.
Use heavy-duty hooks beside the entrance for hoses, helmets, and folding chairs. A narrow cabinet can protect screws, paintbrushes, and gardening gloves from dust. Choose transparent containers for small parts, but label the front, not only the lid. A 12-inch shelf may preserve a useful walking path, while a deep shelf can quietly steal it. Measure door swing and roof slope before buying anything. I have found that “maximum storage” sometimes creates an unusable shed.
Tips: Leave a small gap between containers and exterior walls to improve airflow. Store heavier boxes below lighter ones. Add a simple inventory card inside the door. The 2023 U.S. Houzz & Home Study found that storage remains a common renovation priority, but organization still depends on daily habits. Review the layout each season. Your first arrangement may be wrong.
A tiny shed works better when every wall has a job. I measure the interior before adding storage, including door swing and roof height. Vertical storage is usually the safest starting point. Install narrow shelves between studs for jars, gloves, and hand tools. Keep heavy items below waist level. A tall pegboard can hold frequently used tools without consuming floor space. Leave a small gap behind stored materials for airflow and moisture control.
Overhead storage suits lightweight, seasonal items such as empty pots or folded tarps. Use a strong, fixed frame and check its fasteners regularly. Never place unstable boxes above head height. The door can become a useful storage zone with slim pockets or hooks. Keep the hardware shallow, or the door may scrape the shelves. I once added hooks without checking clearance. The door barely closed, and the arrangement had to be changed.
Corners often become wasted space, but triangular shelves can hold bottles, twine, and spare fittings. A rotating corner rack may improve access, though it can reduce usable shelf depth. Labeling helps, but labels fade in damp sheds. Use simple, readable markings and review them each season. Keep a clear walkway near the entrance. A tidy shed still needs room for safe movement.
| Storage Zone | Best Storage Idea | Typical Dimensions | Useful Capacity | Best Items to Store | Space-Saving and Safety Notes |
|---|---|---|---|---|---|
| Vertical Wall Zone | Full-height adjustable shelving | 12–16 in. deep; 12–16 in. vertical spacing; use the available wall height | About 4–6 shelves per 6–8 ft. wall section | Plant pots, paint cans, hand tools, hardware bins, and folded tarps | Anchor the shelving to wall studs or suitable blocking. Place heavier items on lower shelves. |
| Overhead Zone | Ceiling-mounted rack or storage loft | 12–24 in. deep; commonly 24–48 in. wide modules | Approximately 2–8 cu. ft. per rack section | Seasonal decorations, empty containers, camping gear, and lightweight lumber | Keep the lowest edge above normal head height and maintain a clear walking path. Attach only to adequately supported framing and follow the rack’s load rating. |
| Door-Back Zone | Slim door-mounted organizer or narrow shelves | 4–6 in. deep; leave clearance from the door frame and latch | About 6–12 small compartments or 3–5 narrow shelves | Gloves, seed packets, pruning shears, measuring tapes, and small accessories | Confirm the organizer will not interfere with the door swing, hinges, weather seal, or lock. Keep the door-mounted load moderate. |
| Corner Zone | Triangular corner shelves or a tall corner cabinet | 12–18 in. projection from each adjoining wall; 12–16 in. shelf spacing | Approximately 3–8 cu. ft., depending on height | Bottles, small bins, extension cords, and infrequently used supplies | Use the corner for items that do not need frequent access. Round or soften exposed shelf edges near the entry path. |
| Tool Wall Zone | Pegboard or slat-style tool panel | Common pegboard panels use 1/4 in. thickness with holes on a 1 in. grid | Stores roughly 10–30 hand tools on a 2 × 4 ft. panel | Hammers, screwdrivers, pliers, levels, utility knives, and paint brushes | Outline tool locations or label hooks to make missing tools easy to spot. Fix the panel to framing or a properly supported backer. |
| Long-Item Zone | Vertical clips or horizontal wall-mounted brackets | Allow 8–12 in. width per tool; length should exceed the longest item by several inches | About 4–10 long-handled tools on a 3–4 ft. wall section | Rakes, shovels, brooms, hoes, and garden forks | Store sharp edges downward or shielded. Keep handles secured so tools cannot fall into the walkway. |
| Under-Bench Zone | Rolling bins, drawers, or slide-out crates beneath a workbench | 16–24 in. bench depth; 18–30 in. clear height below the work surface | Two to four medium bins, depending on bench width | Fasteners, soil amendments, power-tool cases, and protective equipment | Use labeled containers and keep a small toe-kick clearance so bins can be pulled out without blocking the main aisle. |
| Folding Storage Zone | Wall-mounted fold-down workbench | 16–24 in. deep when open; folds nearly flat when closed | Creates one temporary work surface without permanently using floor area | Potting, repairs, sharpening, and small maintenance projects | Use locking hinges or folding brackets rated for the intended load. Close the bench before moving large equipment. |
| Floor Equipment Zone | Dedicated parking area with wheel stops or wall hooks | Measure the equipment footprint, then add at least 3–6 in. of side clearance | One mower, cart, bicycle, or compact outdoor machine | Lawn mower, wheelbarrow, garden cart, bicycle, or snow tools | Keep the entry route and emergency exit clear. Store fuel and chemicals only as permitted by local fire and safety rules. |
| Ceiling Joist Zone | Simple rails for lightweight boards or seasonal items | Use the gap between joists; keep stored items below the roof structure | Several lightweight boards, folding chairs, or flat storage totes | Trim pieces, folding tables, empty totes, and lightweight seasonal equipment | Do not overload ceiling members. Avoid storing wet, leaking, flammable, or unusually heavy items overhead. |
2026 Best Tiny Shed Storage Ideas to Maximize Space?
A tiny shed works best when every tool has a visible, reachable position. Store heavy items between knee and waist height. Keep sharp tools on wall-mounted holders, with handles facing outward. This reduces awkward reaching and accidental contact. The Occupational Safety and Health Administration identifies struck-by objects, falls, and overexertion as common workplace hazards. A shed deserves the same practical caution.
Use clear bins for screws, fittings, and seasonal supplies. Label both the lid and front edge. Leave a narrow walking path, even when storage feels limited. The 2024 Liberty Mutual Workplace Safety Index estimated $58.5 billion in serious workplace injury costs during 2022. That figure supports a simple lesson: organization is a safety control, not decoration. I still find that small sheds become messy quickly. A perfect system rarely survives real use.
Tips: Place frequently used tools near the entrance. Keep chemicals upright, sealed, and separated from heat sources. Check shelves for sagging each month. Do not exceed their stated load limits. The U.S. Consumer Product Safety Commission recommends following product instructions and removing damaged equipment from use. Add a small inspection card inside the door. Record loose handles, rust, leaks, and blocked exits. Five minutes can prevent a frustrating mistake.
A tiny shed stays efficient only when every item has a designated return point. I label clear bins by task, not by object: pruning, painting, repairs, and seasonal tools. This reduces searching and prevents floor-level clutter. The U.S. Environmental Protection Agency recommends keeping indoor relative humidity between 30% and 50%. I use a small hygrometer near the wall, because damp corners can quietly damage cardboard, timber, and metal tools.
Inspect the shed monthly, even when nothing looks wrong. Check roof seams, door alignment, fasteners, and signs of condensation. The U.S. Department of Energy identifies air sealing and moisture control as important parts of durable building performance. A five-minute inspection can reveal a loose hinge before water enters. Small failure, expensive lesson.
Keep heavy containers below waist height, and leave a narrow path to the rear wall. Shelves should remain partly empty; overloaded storage makes future changes difficult. I once stored a rarely used ladder across the doorway, which defeated the entire system. That mistake changed my rule: frequently used items stay between knee and shoulder height, while seasonal equipment goes higher. Review the layout every three months. Needs change. Your storage system should admit that.
Measure floor length, wall height, door swing, and window positions. Note roof slopes and lighting. Small details matter.
Keep at least a 30-inch clear path near the entrance. This allows easier carrying and safer turning. Do not block it.
List every item before buying storage equipment. Group tools, garden supplies, cushions, and seasonal equipment. Measure the largest item.
Store daily-use tools between waist and shoulder height. This reduces bending and searching. Keep heavier items below lighter ones.
Use shallow shelves on upper walls for seasonal tools and sealed containers. Install hooks for hoses, helmets, and folding chairs.
Use transparent containers for screws, gloves, and small parts. Label the front, not only the lid. Labels can still fail.
Leave a small gap between containers and exterior walls. Improve airflow around stored items. Check for dampness after heavy rain.
Do not plan shelves around empty floor space alone. Check the door’s opening arc and walking route. My first plan failed.
Reassess the arrangement after one month and each season. Some items may need different homes. A perfect layout is unlikely.
Maximizing a tiny shed begins with understanding its available floor area, wall height, entry points, and everyday storage needs. The key is to create a layout that keeps frequently used tools within easy reach while reserving less accessible areas for seasonal supplies. To learn how to maximize storage in a tiny shed, combine sturdy vertical shelves, wall-mounted hooks, compact cabinets, stackable containers, and labeled bins. These solutions use unused wall and ceiling space without making the shed difficult to move around in.
Build dedicated storage zones along the walls, above the workspace, behind the door, and in corners that would otherwise be wasted. Group similar tools and supplies together, store heavy items low, and keep sharp or delicate equipment secure. A clear walkway and practical labels improve safety and efficiency. Finally, maintain the system by returning items after use, removing unnecessary supplies, checking containers regularly, and adjusting the layout as storage needs change.

Beamer Garden